 Tweet
Tweet
Product Review: Mother's PowerBall 4Lights® Headlight Restoration Kit
I would like to preface this by saying that this review will not be a reiteration of the printed instructions, nor a step-by-step documentation on how to use the product. Mother's already has a couple of very nice videos available on their website that illustrate how to use this product. What this article will be is a recount of my experience using this product per the instructions, my opinion of how the product performed, and whether or not I was satisfied with the results.
With that said, on to the review.
Most new cars today come with plastic headlight lenses. Over time, the clear coat on these lenses will start to oxidize or "yellow". Often times, it can cloud the headlight lens to the point that light output is severely reduced and this can present a large safety hazard. My car was no different. I own a 2001 Ford SVT Mustang Cobra and its headlights slowly lost their brightness due to oxidation. I have tried a few different products over the last couple of years and none of them worked anywhere near what I expected.
While speaking with a friend at a recent car show, recounting my experiences with the four to five different products I had tried, he asked me if I had tried the Mother's headlight restoration kit. I mentioned that I had seen the kit on sale at a local auto parts store and was contemplating purchasing it. It was during our conversation that he mentioned his experiences with the product on his vehicle, a Ford SVT Contour, and how well it worked. I then decided that I would give this product a shot, before I decided to simply purchase new headlight lenses.

I received the product about two weeks after the show, along with a few other Mother's products, courtesy of my friend Jim. The box contained everything I would need to complete the job:


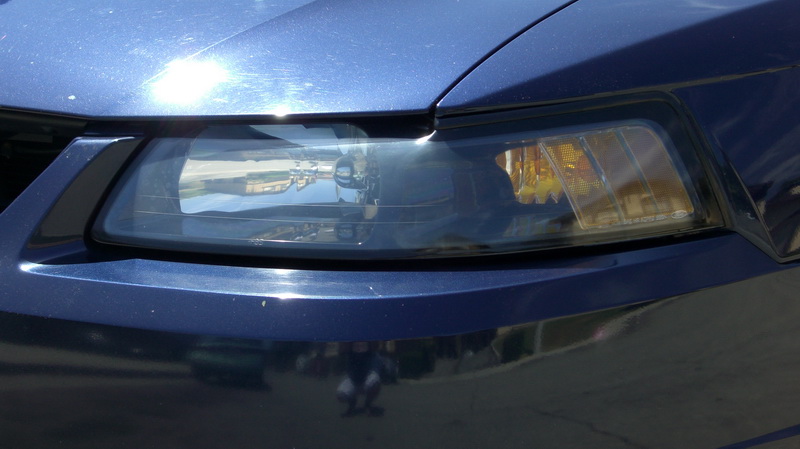
The pictures below will show the headlights in the condition they were at the time I removed them to start the restoration procedure:
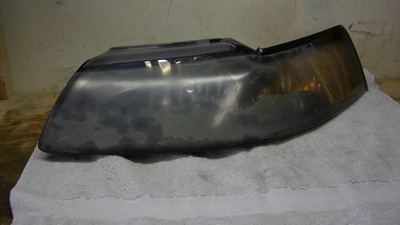

As you can see, they are not in the best shape. With my vehicle, I was able to easily remove the headlight lenses. This may not be the case with your vehicle, so it may be necessary to mask off the area around the headlight lens with blue painter's masking tape to protect your paint.
The first step in the process would be to clean the lenses, dry them, then use the product per the instructions on the back of the box. I attached the PowerBall to my cordless drill, applied the polish to the PowerBall, then applied the PowerBall to the headlight lens. I actually did this about 2-3 times per lens to compare results and to see how well the basic directions worked.
Unfortunately, the lenses were still very oxidized. I realized that I would need to use the Severe Damage Headlight Restoration Pack that came with the kit. This pack comes with two restoration sanding pads, which are simply two two-sided pads with a progressively finer grit piece of wet sandpaper on each side. Pad 1 had one side with 800 grit and the other with 1,000 grit. Pad 2 had one side with 1,500 grit and the other with 2,000 grit. It also comes with a printed set of instructions on how to use the restoration pads.

Now, with any project that requires the use of wet sandpaper, you should keep a handy amount of water around to keep both the sandpaper and sanding surface wet. To do this, I simply used a two gallon bucket and filled it with water. I also used a small cup that would keep the restoration pads wet when I wasn't using them. While doing this process, I did change the water between steps 1 and 2 of the sanding process for each lens. I did this to keep the water cleaner and to prevent the pad surface from becoming too dirty during use.


One of the things the Pack instructions did not mention was how long to sand on each pad. It did mention that with each successively finer pad, the sanding time should increase accordingly, and that each step should be done until the lens had a uniform look. With step 1, I wound up spending about 15-20 minutes. Here are some pics to show how the lens should look like at this point:


I would like to preface this by saying that this review will not be a reiteration of the printed instructions, nor a step-by-step documentation on how to use the product. Mother's already has a couple of very nice videos available on their website that illustrate how to use this product. What this article will be is a recount of my experience using this product per the instructions, my opinion of how the product performed, and whether or not I was satisfied with the results.
With that said, on to the review.
Most new cars today come with plastic headlight lenses. Over time, the clear coat on these lenses will start to oxidize or "yellow". Often times, it can cloud the headlight lens to the point that light output is severely reduced and this can present a large safety hazard. My car was no different. I own a 2001 Ford SVT Mustang Cobra and its headlights slowly lost their brightness due to oxidation. I have tried a few different products over the last couple of years and none of them worked anywhere near what I expected.
While speaking with a friend at a recent car show, recounting my experiences with the four to five different products I had tried, he asked me if I had tried the Mother's headlight restoration kit. I mentioned that I had seen the kit on sale at a local auto parts store and was contemplating purchasing it. It was during our conversation that he mentioned his experiences with the product on his vehicle, a Ford SVT Contour, and how well it worked. I then decided that I would give this product a shot, before I decided to simply purchase new headlight lenses.
I received the product about two weeks after the show, along with a few other Mother's products, courtesy of my friend Jim. The box contained everything I would need to complete the job:
- Mother's PowerBall drill attachment
- Mother's PowerPlastic polish
- a micro fiber cloth
- Mother's Severe Damage Headlight Restoration Pack


The pictures below will show the headlights in the condition they were at the time I removed them to start the restoration procedure:


As you can see, they are not in the best shape. With my vehicle, I was able to easily remove the headlight lenses. This may not be the case with your vehicle, so it may be necessary to mask off the area around the headlight lens with blue painter's masking tape to protect your paint.
The first step in the process would be to clean the lenses, dry them, then use the product per the instructions on the back of the box. I attached the PowerBall to my cordless drill, applied the polish to the PowerBall, then applied the PowerBall to the headlight lens. I actually did this about 2-3 times per lens to compare results and to see how well the basic directions worked.
Unfortunately, the lenses were still very oxidized. I realized that I would need to use the Severe Damage Headlight Restoration Pack that came with the kit. This pack comes with two restoration sanding pads, which are simply two two-sided pads with a progressively finer grit piece of wet sandpaper on each side. Pad 1 had one side with 800 grit and the other with 1,000 grit. Pad 2 had one side with 1,500 grit and the other with 2,000 grit. It also comes with a printed set of instructions on how to use the restoration pads.
Now, with any project that requires the use of wet sandpaper, you should keep a handy amount of water around to keep both the sandpaper and sanding surface wet. To do this, I simply used a two gallon bucket and filled it with water. I also used a small cup that would keep the restoration pads wet when I wasn't using them. While doing this process, I did change the water between steps 1 and 2 of the sanding process for each lens. I did this to keep the water cleaner and to prevent the pad surface from becoming too dirty during use.


One of the things the Pack instructions did not mention was how long to sand on each pad. It did mention that with each successively finer pad, the sanding time should increase accordingly, and that each step should be done until the lens had a uniform look. With step 1, I wound up spending about 15-20 minutes. Here are some pics to show how the lens should look like at this point:


Comment