Announcement

Collapse
No announcement yet.

Project Beautiful Beast work log

Collapse
X
 
  • Filter
  • Time
  • Show
Clear All
new posts

  • #31
    Its been a while since I last posted mainly due to school and SETBACKS. This project has been a HUGE hassle, but as of today I'm finally making progress again. Once again, me posting progress= long write up.

    When we last left off I was rolling my fenders to make room for the new tires and stance. Front fenders were a breeze, rear fenders... not so much. The fender roller ended up being slightly too large for my application which made it extremely difficult to fit onto the fender lip. So difficult in fact that while it was on the lip, it was also riding the inside of the rear wheel well. My rear fenders are pretty well ****ed... Oh well, you live and you learn, and then you get LUVS!

    After destroying my rear fenders, but at least making room I decided to get the car down on the road and see how she drove. As I feared, the front was fine but the rear was riding on the bump stops. The rear coils were set as low as they would go, and still sat higher than the front, so raising the car up to sit off the bumpstops didn't seem like a viable idea. What to do what to do...

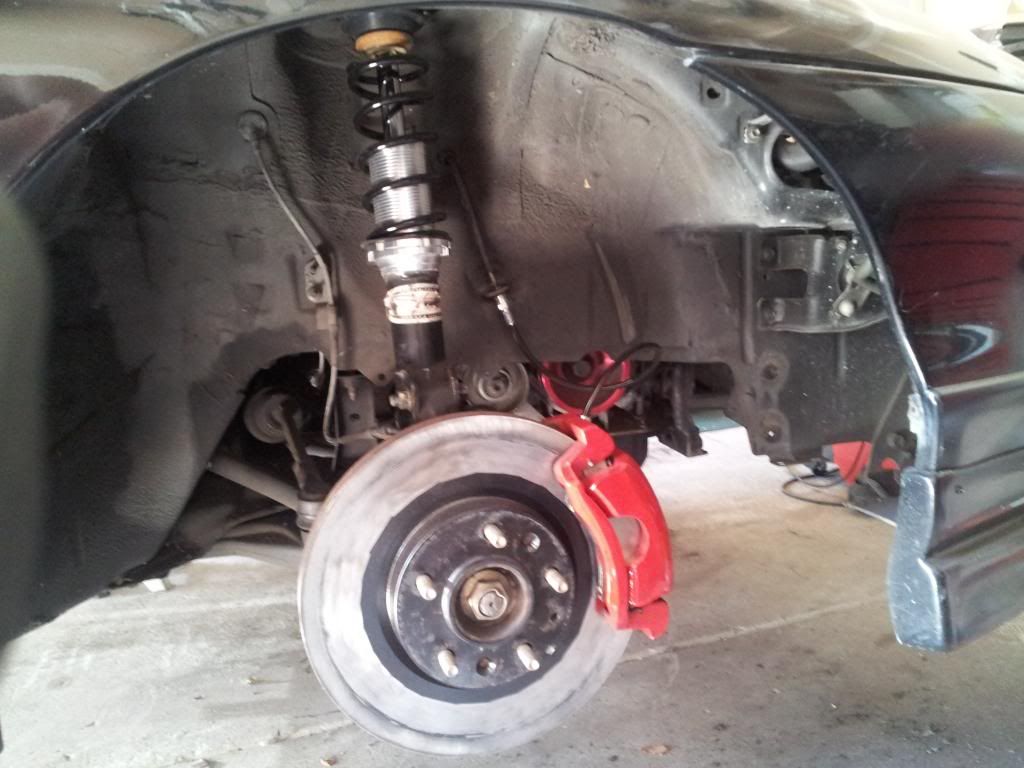
    At the same time I had just finished cleaning up, painting, and installing the Mazda 6 brakes and was ready to test them out. On that same drive I was riding on the bumpstops, I also had basically no brake pedal. Upon further inspection I realized my old SS braided lines were shit and shot, so replacement was necessary.

    To add insult to injury, when test fitting the new wheels with the new brakes, I still needed to grind away more of the caliper! How many problems can a guy have! Temporarily deterred, I stopped work and focused on other things.

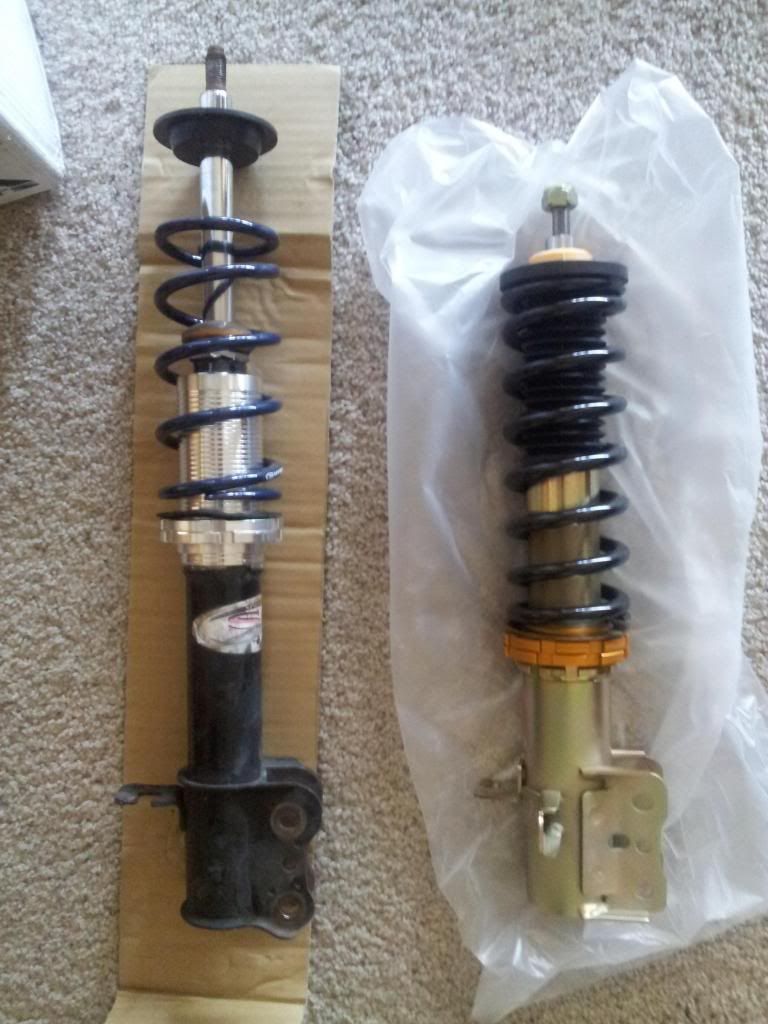
    As time passed I thought of the car from time to time and finally decided I wanted to throw more money at it. First things first, I bit the bullet and just bought some Yonakas. Suspension expirement failed, but much learned. I could have purchased Tokico Illuminas and had (Im hoping) a lower bump stop which would have allowed me to ride at the height I wanted, but seeing as how yonakas were cheaper it seemed the obvious choice. Sure enough upon comparison the difference in overall strut height is HUGE.


    rear


    front


    front with stockish struts installed


    front with Yonakas installed

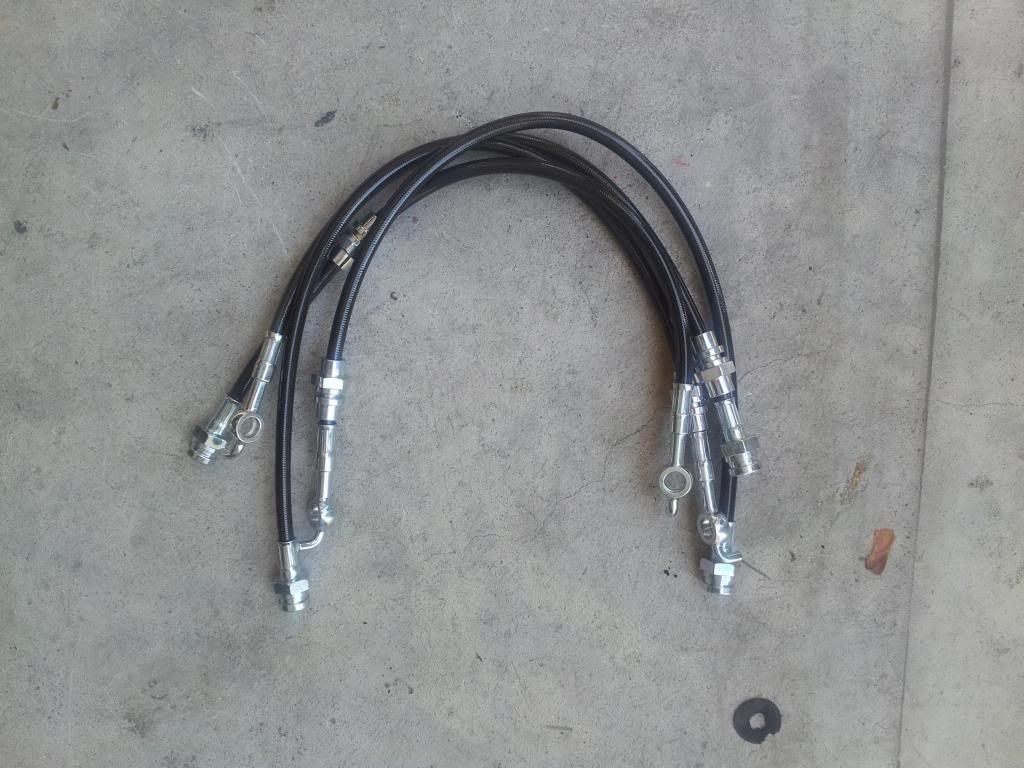
    While I was at it I purchased new SS brake lines and ground down more of the caliper and repainted it.


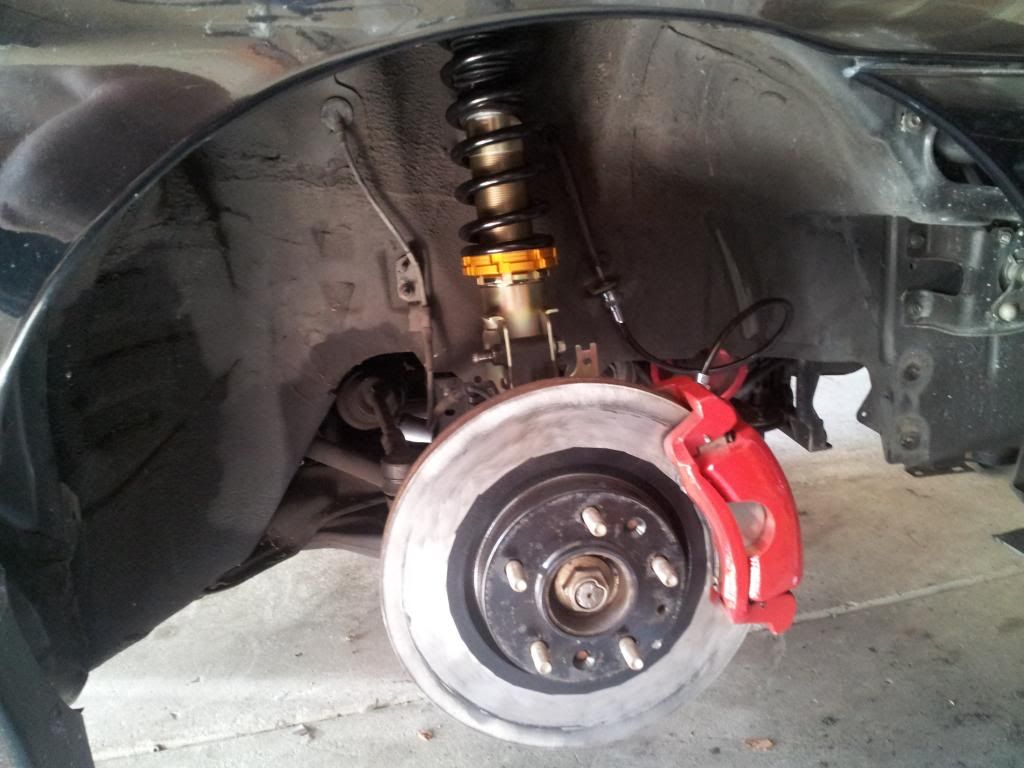
    the lines have a black casing on them... everything's looking pretty new down in the wheel wells now!

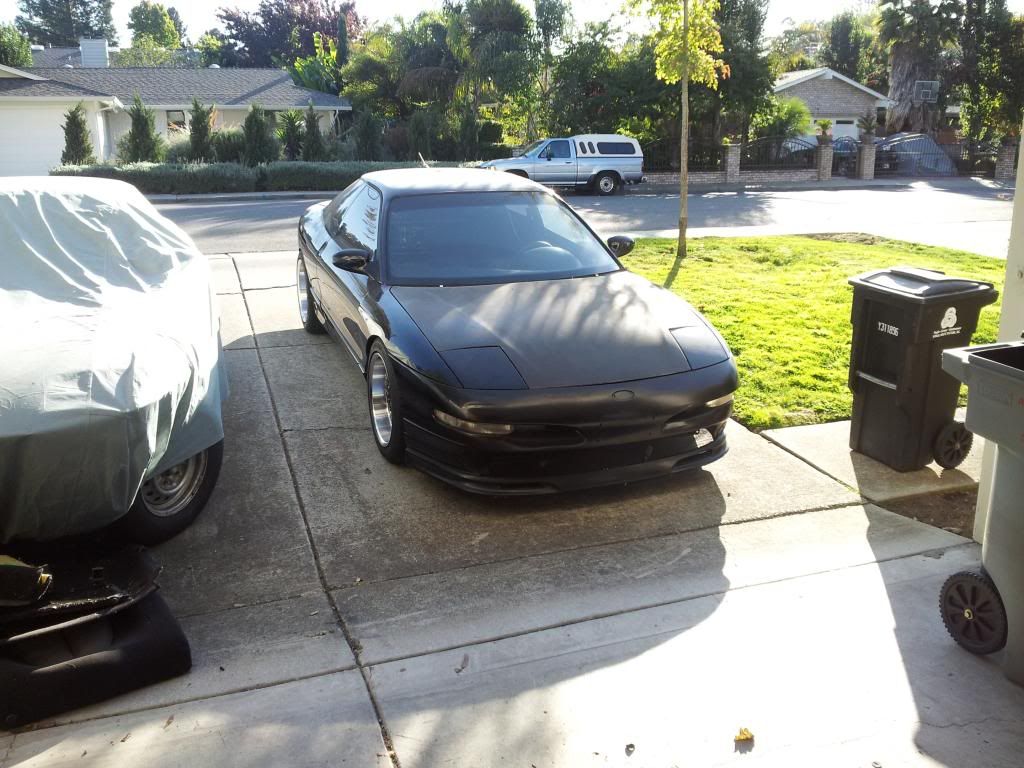
    With everything installed and looking good, I put the car back down on the ground and checked it out. The ride height is about the same overall as the previous setup, with the front maybe a touch higher and the rear looking a touch lower. Starter her up, and took her for a drive, and everything is looking great! Brake pedal is nice and firm, no pure bump stop rides, and the wheels clear the calipers. GREAT SUCCESS! Couple dirty pictures for fun...


    Now that Im back in the spirit of things there is much work to come. Expect many updates in the near future, specifically CZT IM, 75mm TB, MS, and nitrous installs.
    Beautiful Beast- 1997 PGT in process of becoming an SC/NA Beast...
    Elo- 1990 BMW 325i weekend car
    Brunhilde- 2003 BMW Z4 3.0 6-speed daily driver
    The Beast- Sleeping in the junkyard...

    Comment


    • #32
      Looks good! I'm picking up yonakas in 2 weeks, can't wait... New rubber may be in order as well
      1993 PGT bucket, SOLD, 1995 PGT, weird no start fixed by branscoset SOLD

      2002 GTI | Raceland Coilovers | Techtonic Turboback on the way!

      Comment


      • #33
        Well its update time. After doing a little MS wire up work I decided it was finally time to continue onto the engine portion of this project. Keep in mind this is phase 1 of 2, so its really more of a working mockup... mainly just to work out the big details and overall setup.

        The engine bay started off dirty and cluttered... which it will unfortunately remain until the engine swap. Anyways, starting point:


        The car has nitrous installed in it, but due to lack of a place to install the solenoids, they were stuffed under the intake:


        Wanting a much cleaner install, I moved the nitrous and purge solenoids to the firewall and ran the purge line along the same path as the brake lines. I originally installed the fuel solenoid on the firewall as well, but after messing with the fuel T attached to the feed line, I decided it would be more efficient and much nicer looking to just have MS control the fuel for the nitrous setup:


        A good amount of work was done, although not all of it can be seen. I replaced the stock manifold with 1 of the 2 known CZT manifolds to exist... the better one, obviously! SS fuel lines, AFPR, AWR front and rear poly mounts, a 75mm mustang tb, 440cc supra injectors, and cleaned up a lot of the aftermarket wiring that had been added over the years:

        Last edited by proboner; March 4, 2014, 06:56 PM.
        Beautiful Beast- 1997 PGT in process of becoming an SC/NA Beast...
        Elo- 1990 BMW 325i weekend car
        Brunhilde- 2003 BMW Z4 3.0 6-speed daily driver
        The Beast- Sleeping in the junkyard...

        Comment


        • #34
          She getting there. Keep it up!

          Comment


          • #35
            that last pic looks good from 5 feet away. I like and am curious of the performance.
            1993 Mercury tRacer :Vitara & mFactory: In progress 2020
            1994 Mercury TrAcer Wagon : '02 SPI swap : sold
            2014 Factory Five 818s: sold
            2000 Lotus esprit v8TT : 1st v8 on MS3x, ls1 coils,h20 injection
            1997 Nissan 200sx 1.6L : 35-39mpg the daily

            Comment


            • #36
              I agree... it does look good from 5 feet away. It doesn't show much of the dirtiness of the engine bay! I suspect the performance will be surperb. The last time I had a similar setup on my car, I raced a former member on here with an e36 m3 stripped to 2700lbs and with 265whp and he barely pulled on me. Once its all running well, I'll dyno and get a few runs in at sac raceway. then do a ZE swap as well as colt 218's and EDIS.
              Last edited by proboner; March 5, 2014, 01:46 AM.
              Beautiful Beast- 1997 PGT in process of becoming an SC/NA Beast...
              Elo- 1990 BMW 325i weekend car
              Brunhilde- 2003 BMW Z4 3.0 6-speed daily driver
              The Beast- Sleeping in the junkyard...

              Comment


              • #37
                Originally posted by proboner View Post
                Well its update time. After doing a little MS wire up work I decided it was finally time to continue onto the engine portion of this project. Keep in mind this is phase 1 of 2, so its really more of a working mockup... mainly just to work out the big details and overall setup.

                The engine bay started off dirty and cluttered... which it will unfortunately remain until the engine swap. Anyways, starting point:


                The car has nitrous installed in it, but due to lack of a place to install the solenoids, they were stuffed under the intake:


                Wanting a much cleaner install, I moved the nitrous and purge solenoids to the firewall and ran the purge line along the same path as the brake lines. I originally installed the fuel solenoid on the firewall as well, but after messing with the fuel T attached to the feed line, I decided it would be more efficient and much nicer looking to just have MS control the fuel for the nitrous setup:


                A good amount of work was done, although not all of it can be seen. I replaced the stock manifold with 1 of the 2 known CZT manifolds to exist... the better one, obviously! SS fuel lines, AFPR, AWR front and rear poly mounts, a 75mm mustang tb, 440cc supra injectors, and cleaned up a lot of the aftermarket wiring that had been added over the years:

                Orly??

                Looks good.
                94 PGT -T, Used to be quick

                94 Black PGT, KLZE, spun bearing, Likely parts car for life

                Comment


                • #38
                  WOW. I cant believe I haven't updated this since 2014... and mainly because I haven't really done any work on it since then.

                  When I left off I was having troubles with my MS2 and, not wanting to deal with it, left it dormant for a while to focus on other things. Lately the bug bit me and I started working on this again pretty much daily. Haven't gotten a lot done that is obvious at first glance, but a ton of the details have been figured out and worked on.

                  As of now here is a short list of the things I have been working on lately and that I have pending on my task list...

                  *Megasquirt: Came back to this after 2 years of paying no attention to it and had to basically relearn everything. Spent the last 2 months trying to figure out why it wasn't getting a tach signal and am now very close to having it running solely with input from the crank trigger with a 36-1 wheel and output to the stock disty. Pretty sure all I need to do is get shielded wiring for the crank input to clean up the signal. If that doesn't work I'm just going to say screw it and buy a MS3x and be done with it.

                  *Interior:
                  - Finished removing all the interior sound deadening
                  - Have removed all excess wiring from from the rear of the car to the front seats
                  - Will be removing the dash again to remove all excess wiring and mount MS/run wiring
                  - Still removing dynamat from rear of the car which is a PITA
                  - Starting on stripping doors of wiring, custom mounting the windows, cutting out the inner skeleton, and cutting out abs plastic door panels

                  *Exhaust:
                  - Ground down/rewelded/painted the custom downpipe I made years ago (purchased a welder to do)
                  - Removed g35 muffler and will just be running 2 resonators under the car to just after the 1st bend
                  - Added wideband bung to downpipe and plugged stock o2's
                  - Installed electric cutout

                  *Battery:
                  - Will be relocating small "race" battery to under front bumper
                  - Installing battery isolator controlled by a switch in the dash

                  *Exterior:
                  - Painting cf hood black to match paint
                  - Likely replacing corksport lip with mach1
                  - Possibility of small 2" fender flares

                  Will be taking many more pictures and updating frequently in the coming months so stay tuned!

                  Also, part of the reason I havent been working on this is due to getting my dads 1990 BMW 325i as my daily. Been doing some work to take it from somewhat run down fully stock form to tasteful and slight modification. You can check out my build thread here: http://www.r3vlimited.com/board/showthread.php?t=359577
                  and for those of you who are too lazy, and because I havent included any pictures so far in this post here's a couple quick shots...


                  Beautiful Beast- 1997 PGT in process of becoming an SC/NA Beast...
                  Elo- 1990 BMW 325i weekend car
                  Brunhilde- 2003 BMW Z4 3.0 6-speed daily driver
                  The Beast- Sleeping in the junkyard...

                  Comment


                  • #39
                    That's no Probe.....
                    90 Mazda 323 - KLZE, fender-flared, right hand drive, 2350 lb fully loaded sex machine. || Pic Thread ||- SOLD
                    93 PGT FRANKENPROBE - 10.24 @ 139.9 mph ||545 whp @ 20 psi || Timeslip || Dyno slip|| Build Thread - GONE
                    97 GTS - Rear Wheel Drive KLZE, 6-speed, 3.90 Torsen LSD, 2650 lb, daily driver! - Build Thread - GONE
                    90 Ghettocet KLiata - forever WIP

                    Comment


                    • #40
                      Haha I had the strangest feeling you were going to show up in this thread...
                      Beautiful Beast- 1997 PGT in process of becoming an SC/NA Beast...
                      Elo- 1990 BMW 325i weekend car
                      Brunhilde- 2003 BMW Z4 3.0 6-speed daily driver
                      The Beast- Sleeping in the junkyard...

                      Comment


                      • #41
                        Now for an actual update...

                        I've been going back and forth for a while on what to do with the doors. I want to lose as much weight as is reasonable, while also keeping things functional and not requiring the car to be kept in a garage for the rest of its life. The main considerations were these:

                        1) Weight reduction
                        2) Removal and/or reorganization of wiring
                        3) Need to keep some sort of window for rain/street parking
                        5) Allow for easy ABS plastic door panel creation
                        6) Keep it simple

                        Spent quite some time staring at the doors, sans panels, trying to figure out exactly how to go about it. A couple weeks ago I had an epiphany and today I worked out a rough draft that worked almost exactly as planned!

                        Unfortunately I didn't start taking pictures of the process until I was part way in... sorry.

                        I started out by unbolting the passenger side window, followed by the track, mount, and motor. With the entire power window assembly out of the car, I reinstalled the mounts onto the window and fit the tracks back on the mounts. I positioned the tracks as they would fit with the window fully rolled up and marked where the lower "knob" of the window mount was located in the track.


                        I then cut the tracks at that location


                        I trimmed what was left of the tracks of any unneeded metal, and test fit them back on the window/mount assembly... looks good!


                        Since the fit looked on point I cut out two small end caps and welded them to the bottoms of the tracks


                        Bolted the tracks back in the door


                        And finally slipped the window back intothe tracks


                        Closed the door to check fit... perfect


                        So there's the rough draft! The motor, 75% of the tracks, and some assorted brackets have been removed, I have the ability to pull the window completely out, and can also put the window in for rain/street parking. As well, this allowed me to remove most of the wiring from the door


                        Next steps are to clean up the brackets and paint them, clean doors of tar, mount the e30 door handles I picked up from the JY, cut out a majority of the interior skeleton, and cut a door panel out of a sheet of 1/8" ABS sheet. A decent amount of work left, but I'm glad this first piece worked as I'd hoped!
                        Beautiful Beast- 1997 PGT in process of becoming an SC/NA Beast...
                        Elo- 1990 BMW 325i weekend car
                        Brunhilde- 2003 BMW Z4 3.0 6-speed daily driver
                        The Beast- Sleeping in the junkyard...

                        Comment


                        • #42
                          Cool.

                          I had a similar idea that I was going to do with lexan windows. I was thinking about keeping the tracks but putting a hole in them for a quick release pin.

                          Quick release pin

                          Then I can just remove the pin and drop the window into the door.

                          Or, if the windows needed a metal frame... I was going to have two bars come off the bottom into the door. In the door there would be a tube for the bars to fit into. Then I would use the quick release or cotter pin two secure the window, or remove it if needed.
                          Currently buying all my parts for my future part-out thread...https://forums.probetalk.com/core/im.../icon_look.gif
                          STEVE B
                          1993 Probe GT
                          2016 Mustang

                          Comment


                          • #43
                            Hmm... I do like the quick release idea!

                            The problem with lexan is that it wont hold the correct shape and you end up having to build a metal frame to get the curvature you need. Also, for me, having to fabricate all of that is getting away from keeping things simple. I'd rather just remove the window all together if I'm really that worried about weight savings.
                            Beautiful Beast- 1997 PGT in process of becoming an SC/NA Beast...
                            Elo- 1990 BMW 325i weekend car
                            Brunhilde- 2003 BMW Z4 3.0 6-speed daily driver
                            The Beast- Sleeping in the junkyard...

                            Comment


                            • #44
                              proglasswindows makes molded/formed windows, different thicknesses, and tinted/non-tinted. They also make the full set or just one.

                              From an e-mail to them asking about Ford Probe availability...

                              "We do make those windows and they are all molded. The material is G.E. mar resistant Lexan. The set in 1/8 is 925.00 and with a 3/16 front add 60.00. The car needs formed windows to look right."

                              There is another member on here that has installed the rear tinted lexan window...
                              Currently buying all my parts for my future part-out thread...https://forums.probetalk.com/core/im.../icon_look.gif
                              STEVE B
                              1993 Probe GT
                              2016 Mustang

                              Comment


                              • #45
                                Might as well have done a complete fiberglass or carbon fiber door if you really trying to cut back on weight


                                Comment

                                Working...
                                X