 Tweet
Tweet
well i wasnt sure...because i dont use it all and i dont even have a top for it and theres a crack in the resevoir too soo y not just make some room
-
Jacob--"Pain must exist in order for healing to survive.
Neither one will ever serve their purpose alone"..Black sheep, August Burns Red.
94' Pgt- kitted and lowered. ebiach coilovers, CIA, headers, Hi-flo cat, ACT stage 2 6 puck sprung clutch....much more and who knows whats next -
Yep, jack the car up, remove the wheel well. Four 10mm bolts if I remember correctly. Pump and reservior are one unit, one connector. One more for the low fluid warning. The line goes up through the same hole that the filler neck is in. Two clips on the strut tower, if you're deleting the system just snap em. Or reach up behind the spring and disconnect them.
If you were really in a hurry, you could do it on the ground. Take out the front most three bolts of the wheel well. 3/8" ratchet with a 8" or so extension.
Check your local laws, many states like PA you must have BOTH windshield washer nozzles in working order to pass inspection.Comment
-
wow, i love the engine bay with the purple and black! looks like it should be the spokes car for royal purple, lol.Old Probe - White 95 PGT - She's in a better place now
New Probe - White 95 PGT (Victoria) I-H-E/Mille Miglia EVO-5 rims/Euro Tails/Ksport Springs/KYB-GR2 struts/ZE-DE Hybrid in the works SOLD
SOLD 
Comment
-
sweet...and as far as inspections...i asked the guy i go to and he said u should have them but.....he didnt seem to care if i took it out...i ask if he was sure and he said yea so y notJacob--"Pain must exist in order for healing to survive.
Neither one will ever serve their purpose alone"..Black sheep, August Burns Red.
94' Pgt- kitted and lowered. ebiach coilovers, CIA, headers, Hi-flo cat, ACT stage 2 6 puck sprung clutch....much more and who knows whats nextComment
-
Rubbing Alcohol will clean your silicone vac lines, I had the same problem with my Samco silicone radiator hoses. Cleans them and actually makes them look new again.
Also are you planning on painting the engine bay or going through all this work and going to keep it the stock under hood color with little to no clear coat? Just wondering but everything looks good and you have a ton of work in the car so far Last edited by lilpavel; February 3, 2009, 10:58 PM.///M-POC
SENSLES 448whp at 24psi Built by Me, Tuned by SHAODOME
Flyrtle 6 - Best 2nd Gen Probe
MMX - PRD BEST of Show and 1st Place Unlimited Class
MM8 - PRD BEST of ShowComment
-
dang im hooked onthis thread LOL...i needs moAr pics and info asapComment
-
Dilute it down put it in a spray bottle with 40% Deionized H20.... Should keep them fricking mint.Originally posted by lilpavel View PostNew Ride: 95 mustang gt...
SOLD !1996 Ford Probe GT- (14.83 @ 91.8 MPH 60' 2.112) KLZE, Mx-3 flywheel,MSD Window Switches, Exedy Clutch, Autometer Gauge pods, cold air intake, Custom 2.5 inch exhaust with flowmaster super 40 muffler, Slammed with cut Dropzone Springs
1993 Base Sold- Lots of interior paint...
Adam LComment
-
Really appreciate the little info like this, thanks! I was pissed I spent a couple hundred on silicone vacuum lines and they looked this shitty.Originally posted by lilpavel View Post
For this time, I'm keeping it how it is. I have a built motor, a turbo kit, a built trans, a body kit, a crapload of interior stuff, etc. but I have another car I need to get this one running at this point. I have another car to take care of, then put the LS1 in the Cobra. Then we'll revisit the Probe. At that time, I'll be powdercoating everything too, I'm tired of this paint chipping and crap. Get some Teins with EDFC and a bolt on front and rear big brake kit and some ridiculous wheels, really go all out with the effort and $$$. I also wanted to drive this tucked setup around for awhile, see the flaws in it, and be able to fix them next time. Cage it, carbon seats, etc.
I'll be shaving a lot of stuff in the engine bay and smoothing it out, then painting it the new body color, possibly Boysenberry. I have a parts car, and this frame thing keeps bothering me, I might just paint that one and swap everything into it. I've always wanted a white Probe with black painted GTS stripes, it would be easier to do a color change on that car, which is essentially a frame.
Same plan is for the Cobra - get the LS1 in and running, drive it around and find the flaws and problems, revisit it with heads/cam/intake/powdercoating/cage/etc./paint. I've found building my cars is easier in steps like this, you do it all at once and it becomes a ten year project that once you're done gets little dings and scratches and stuff breaks and you want to kill yourself.
Heading out now, I was ****ing dead from yesterday, have the wife with me so hopefully lots of little progress again today. I'll be posting super late again. Hopefully Friday/Saturday I have a good amount of time to get some fuel system pics, you guys are going to shit yourselves.Originally posted by akmer View PostComment
-
I was a good boy today, I took my list and put it in order of the things I wanted to do least and feared the most. Then, I started from there.
The wonderful broken VSS bolt.
http://i161.photobucket.com/albums/t...y/IMG_4348.jpg
disassembling the EGR valve gave me enough room to get the drill in there straight. Gotta love the effect of time and moisture on factory tiny phillips head screws...not.
http://i161.photobucket.com/albums/t...y/IMG_4350.jpg
http://i161.photobucket.com/albums/t...y/IMG_4349.jpg
granted, a self tapping screw isn't the greatest solution, but it's tight, and the alternative was a huge glob of RTV. If I didn't have the built trans sitting and waiting to go in, I might care more.
http://i161.photobucket.com/albums/t...y/IMG_4351.jpg
Ground down the oil pump fins on my beautifully painted new oil pump and installed the UDP.
http://i161.photobucket.com/albums/t...y/IMG_4352.jpg
Fixed up that leak good, painted the cover. Used a longer bolt, hopefully that helps the cover seal even with 3/8" clamp on top of it.
http://i161.photobucket.com/albums/t...y/IMG_4353.jpg
My way of filling the trans. Not the fastest, but I was doing other stuff so I didn't need it to be fast. Zero spilling, that was cool.
http://i161.photobucket.com/albums/t...y/IMG_4354.jpg
Finished grinding the passenger side and welded the steering knuckles - the front brakes are officially done, and I'm quite a bit more confident in the safety factor than before. I'll still be extremely careful on the maiden voyage and do some extensive testing on them before I'm ready to trust these daily.
http://i161.photobucket.com/albums/t...y/IMG_4367.jpg
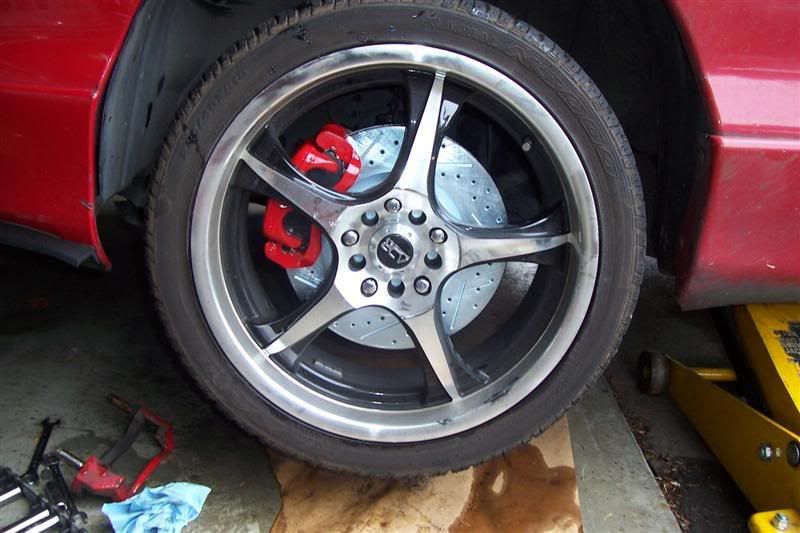
Damn those 18's make those look like stock brakes. Jeez, for 8 hours of work I feel like I got a lot done, but no pictures to show for it.
Last edited by 95PGTTech; February 6, 2009, 12:44 PM.
Jeez, for 8 hours of work I feel like I got a lot done, but no pictures to show for it.
Last edited by 95PGTTech; February 6, 2009, 12:44 PM.Comment
-
wat brakes are u running?2012 Ford Focus Hatch
Eibach Pro-Kit. AEM CAI, Magnaflow Exhaust. Steeda Rear Sway Bar. RS Spoiler. RS Hood. 18" MSW Wheels
16.28 @ 86.56Comment
-
1998 Mitsubishi 3000GT calipers
EBC red pads
drilled and slotted rotors
stainless lines
As I documented in another thread, these second generation 3000GT brakes are MUCH larger in diameter and in depth, as well as having four piston calipers. However, they are NOT direct bolt on like first generation 3000GT brakes are - it's not worth the trade off, I had to grind about a half inch off the spindle mounting tabs and slot the bolt holes and move them inboard about a half inch.Comment
-
THEY LOOK SO BADASS IN PERSON!Originally posted by 95PGTTech View PostNew Ride: 95 mustang gt...
SOLD !1996 Ford Probe GT- (14.83 @ 91.8 MPH 60' 2.112) KLZE, Mx-3 flywheel,MSD Window Switches, Exedy Clutch, Autometer Gauge pods, cold air intake, Custom 2.5 inch exhaust with flowmaster super 40 muffler, Slammed with cut Dropzone Springs
1993 Base Sold- Lots of interior paint...
Adam LComment
-
Ugh...look at them...they look ****ing tiny.
What a waste of time.
I need to find a big brake kit that delivers at least 14" of rotor.Comment
-
Mine look tiny too with 18''
 93 PGT Kitted and all -sold,
Current 93 PGT-ZE-T So far: 12" brakes, ZE, T3/T4 turbo, 2.5" exhaust , ACT 6-puck, MSD6AL+2step, Coilovers, 245/45/17x9 cobra r, 67mm TB, MS II, traction bars, meth inj. and more.
1980 Corvette Vortec 350 and side pipes
 OBJECTS IN THE MIRROR ARE LOSING
Comment
-
looks like great progress was made....and if u dont like ur 18's u can give them to me and ill give you my stockers LOLComment
Comment